Speech service profiles
In the following, you will learn how to customize speech-to-text or text-to-speech profiles under Speech service profiles, depending on which provider you use. You can select different languages to represent which languages your profile supports.
Speech-to-text profile
In the following, you will learn how to create or delete a speech-to-text profile.
Create speech-to-text profile
How to create a speech-to-text profile:
Requirement
- You have received the REST endpoint ID and subscription key from your speech-to-text service provider.
- In the navigation bar under Administration, click Speech service profiles.
- Under Speech-to-text profiles, click
 .
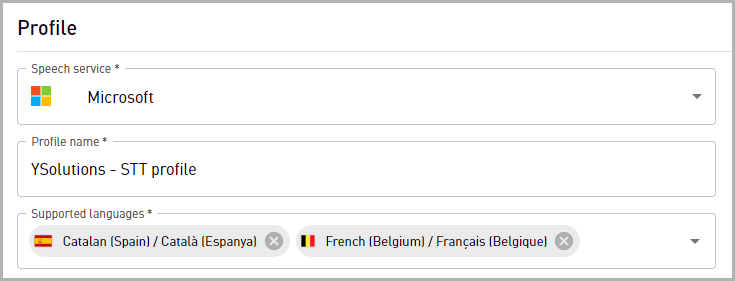
. - Under Profile, select a Speech service.
- Enter a Profile Name.
- Select at least one language in Supported languages to express which languages are supported by the profile.
- Under Static gain, select the static gain adjustment that should be applied to the input volume. The value “0” leaves the input volume unchanged.
- If you want the input volume of callers to be automatically set to a uniform level, activate the switch Automatic gain control. You can set the automatically regulated, uniform level using the slider Static gain.
- Depending on the selected service, you can enter the (Service) Advanced settings.
- If you have selected Microsoft, make the following settings or enter the following data:
- If you want to activate streaming, slide the switch to Streaming enabled.
- If you want profanity to be censored with asterisks in the transcription results, slide the switch to Filter out profanity.
- Enter a REST endpoint ID.
- Choose an Azure region.
Tip: If no region is specified, westeurope is used by default. - Enter a Subscription key.
Tip: If you do not enter a subscription key, the default VIER speech service profile is automatically used.
Notice: The subscription key is only visible when a new speech-to-text profile is created. After saving the speech-to-text profile, the product key is only displayed in encrypted form, even in editing mode. In this case, you can replace the subscription key with a new one if necessary. - If you want to specify phrases that should be recognized preferentially during transcription, enter them under Preferred phrases.
Tip: Confirm each phrase entered with the Enter key.
Tip: If you want to use phrases for specific sections in the dialog that should be recognized preferentially during transcription, you must specify them via the API endpoint /call/transcription/switch. For more information https://cognitivevoice.io/specs/#/call/switchTranscription. - If you have selected Google, make the following settings or enter the following data:
- Enable streaming by switching to Streaming enabled.
- If you want profanity to be censored with asterisks in the transcription results, slide the switch to Filter out profanity.
- If you want to specify phrases that should be recognized preferentially during transcription, enter them under Preferred phrases.
Tip: Confirm each phrase entered with the Enter key.
Tip: If you want to use phrases for specific sections in the dialog that should be recognized preferentially during transcription, you must specify them via the API endpoint /call/transcription/switch. For more information https://cognitivevoice.io/specs/#/call/switchTranscription. - Select a suitable Transcription model. For detailed information about the individual models, see https://cloud.google.com/speech-to-text/v2/docs/transcription-model?hl=de.
- In Service account login data upload the JSON file you got when creating the service account at Google. This JSON file contains the credentials required for the integration with VIER Cognitive Voice Gateway.
Notice: The login data for your service account is only visible when you create a new speech-to-text profile. After saving the speech-to-text profile, the login data is only displayed in encrypted form, even in editing mode. In this case, you can replace the login data with new ones if necessary. - If you have selected IBM, make the following settings or enter the following data:
- If you want profanity to be censored with asterisks in the transcription results, slide the switch to Filter out profanity.
- Enter the Server URL you got from IBM.
- Enter the API key you got from IBM.
Notice: The server URL and the API key are only visible when a new speech-to-text profile is created. After saving the speech-to-text profile, the server URL and the API key are only displayed in encrypted form, even in editing mode. In this case, you can replace the server URL and the API key with new data if necessary. - If you have selected Deepgram (US-hosted), make the following settings or enter the following data:
- If you want to use your own Deepgram instance, enter the Endpoint URL of your instance.
- Enter the API key of your Deepgram instance.
- Under Model, enter the Deepgram model you want to use.
- If you have selected OpenAI Whisper (US-hosted), make the following settings or enter the following data:
- Enter the Deployment URL you received from OpenAI.
- Enter the API key.
Notice: The deployment URL and the API key are only visible when a new speech-to-text profile is created. After saving the speech-to-text profile, the deployment URL and the API key are only displayed in encrypted form, even in editing mode. In this case, you can replace the deployment URL and the API key with new data, if necessary. - Under Prompt for instructing the speech service, instruct the speech service how to behave during transcription.
- If you have selected VIER, make the following settings or enter the following data:
- Under Prompt for instructing the speech service, instruct the speech service how to behave during transcription.
- Click Save.
- Your speech-to-text profile is saved.

Delete speech-to-text profile
How to delete a speech-to-text profile:
- In the navigation bar under Administration, click Speech service profiles.
- Select the speech-to-text profile you want to delete.
- Click Edit and click Delete.
- Click Confirm.
- Your speech-to-text profile has been deleted.
Text-to-speech profile
In the following, you will learn how to create or delete a text-to-speech profile.
Create text-to-speech profile
In the following, you will learn how to create a text-to-speech profile. For this purpose, you will perform the following actions:
- Enter profile basic data
- Set up voice
- Make advanced settings depending on the speech service
Enter profile basic data
How to enter profile basic data:
- In the navigation bar click Administration > Speech service profiles > Text-to-speech profiles >
 .
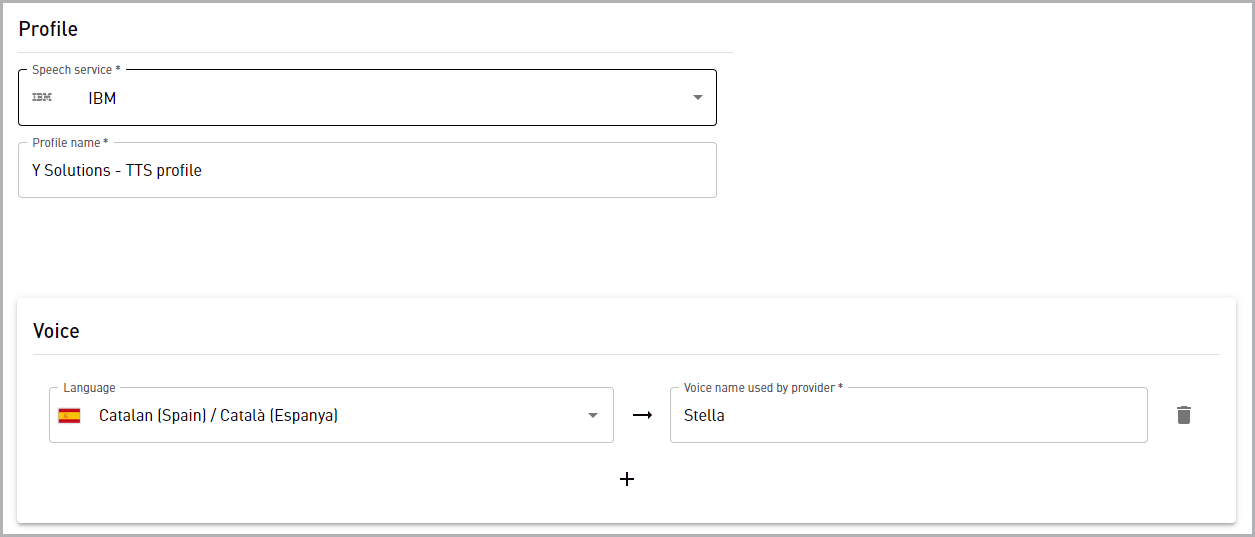
. - Under Profile basic data select a Speech service .
- Enter a Profile name.
- If you want to configure support for SSML in your speech service profile to override the default behavior of the service, select the desired option under SSML support.
- You have entered profile basic data.
Set up voice
How to set up voice:
- Click
 .
. - Under Voice, select at least one Language.
- Enter a Voice name used by provider.
Make advanced settings depending on the speech service
- If you have selected ElevenLabs (US-hosted), you can enter the data for your ElevenLabs account under ElevenLabs (US-hosted) Advanced settings.
- Under Model, enter the ElevenLabs model you wish to use.
- Enter the API key. Notice: The API key is only visible when a new text-to-speech profile is created. Once the text-to-speech profile has been saved, the API key is only displayed in encrypted form, even in editing mode. In this case, you can replace the the API key with a new API key if necessary.
- If you have selected OpenAI, under OpenAI Advanced settings you can set the Speaking rate.
- or
If you have selected Google, under Google advanced settings you can set the Speaking rate. - Enter the login data for your Google service account directly under Service account login data or click LOAD LOGIN DATA FROM JSON FILE and choose the file containing the data.
Notice: The service account login data is only visible when a new text-to-speech profile is created. Once the text-to-speech profile has been saved, the service account login data is only displayed in encrypted form, even in editing mode. In this case, you can replace the data with new data if necessary. - or
If you have selected Amazon, you can enter the data of your Amazon service account under Amazon Advanced settings. - Enter the Access key ID.
- Enter the Secret access key.
Notice: The access key ID and the secret access key are only visible when a new text-to-speech profile is created. Once the text-to-speech profile has been saved, the access key ID and the secret access key are only displayed in encrypted form, even in editing mode. In this case, you can replace the access key ID and the secret access key with new data if necessary. - or
If you have selected Microsoft, you can enter the data of your Microsoft service account under Microsoft Advanced settings. - Enter the REST endpoint URL.
- Enter the Authentication URL.
- Enter the Subscription key.
Notice: The REST endpoint URL, the authentication URL and the subscription key are only visible when a new text-to-speech profile is created. Once the text-to-speech profile has been saved, the REST endpoint URL, the authentication URL and the subscription key are only displayed in encrypted form, even in editing mode. In this case, you can replace the data with new data if necessary. - or
If you have selected IBM, under IBM Advanced settings you can set the Speaking rate. - Enter the Server URL of your IBM service account.
- Enter the API key of your IBM service account.
Notice: The server URL and the API key are only visible when a new text-to-speech profile is created. Once the text-to-speech profile has been saved, the server URL and the API key are only displayed in encrypted form, even in editing mode. In this case, you can replace the server URL and the API key with new data if necessary. - Click Save.
- You have set up voice.
- You have created a text-to-speech profile.

Delete text-to-speech profile
How to delete a text-to-speech profile:
- In the navigation bar under Administration, click Speech service profiles.
- Select the text-to-speech profile you want to delete.
- Click Edit and click Delete.
- Click Confirm.
- Your text-to-speech profile has been deleted.