Edit Forward Call node
Using the Forward Call node, you can forward a call to another destination.
For details on adding a VIER node, see Add a VIER node.
How to edit the Forward Call node:
- To make settings for the node, click on the Forward Call node.
- The window with the configuration options opens.
- Under General Settings, enter the Destination Phone Number to which the call will be forwarded.
- Under Call Settings, enter the Displayed Caller ID. The displayed caller ID is the phone number that is displayed to the callee.
- Under Ring Timeout (in s), enter the maximum time in seconds that the call should ring before the call attempt is cancelled.
- or
To insert the desired value, click on the arrows. - To set the voicebot to accept answering machines, activate the switch Accept Answering Machines.
- User-To-User Information…
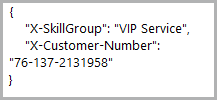
- If you want to use custom SIP headers that are transferred to the target system with the call, then store them under Custom SIP Headers.
Example: 
- If you want to specify data that is stored as custom data in VIER Cognitive Voice Gateway and can be retrieved by downstream systems, specify this under Custom Data.
- Under Additional Settings, enter a Whispering Announcement. The whispering announcement is a text that is announced to the agent the call is transferred to before the call partners are connected.
- To stop the flow after the execution of the node Forward Call, activate the switch Quit Flow.
- To let the voicebot play a ringing tone during a pending call, activate the switch Enable Ringing Tone.
- Optionally assign a different Label under Settings. This label will be displayed in the Chart.
- Add a Comment if required. This comment will be displayed in the Chart in the node.
- or
see Add a new comment. - Enter an Analytics Step if required. This analytics step is recorded in Cognigy Insights when the node is executed in the dialog.
- To save the settings click Save Node.
- To discard the settings click Cancel.
- The settings have been saved.