Customers
In the following, you will learn how to create, edit, delete or restore a customer.
Add customer
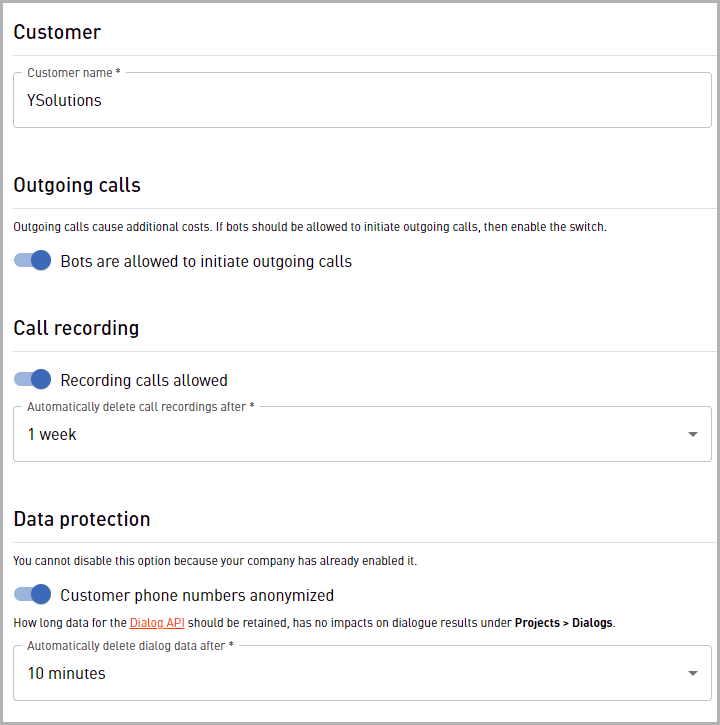
In the following, you will learn how to add a customer. For this purpose, you will perform the following actions:
- Enter a customer name
- Set up outgoing calls
- Set up call recordings
- Set up data protection options
TIP
Display anonymized phone numbers
If it is not necessary for a bot or bot developer to know the customer’s phone number, then VIER Cognitive Voice Gateway can anonymize it (see advanced options > Data protection > Anonymize phone numbers for bot and integrations). This means that Conversational AIs such as Boost, Cognigy, Dialogflow, Rasa, Ubitec, other API users and integrations only see an anonymized phone number.
Enter a customer name
How to enter a customer name
- In the navigation bar under Administration, click Customers.
- Click
 .
. - Under Customer, enter a Customer name of your choice.
- You have entered a customer name.
Set up outgoing calls
How to set up outgoing calls:
To enable your voicebot to initiate outgoing calls, under Outgoing calls, switch to Bots are allowed to initiate outgoing calls.
Tip: Outgoing calls are needed e.g. for an agent handover to a contact center via /call/forward/ or for voicebots that initiate calls via /call/dial.
You have set up outgoing calls.
Set up call recordings
How to set up call recordings:
- To enable call recordings, under Call recording, switch to Recording calls allowed.
NOTICE
Deactivation of call recordings
If call recording has been disabled on the reseller, customer or department level, then you cannot enable call recording for your bot.
- When you enabled call recordings, under Automatically delete call recordings after select a period of time, after which call recordings will be deleted automatically.
You have set up call recordings.
Set up data protection options
How to set up data protection options:
- If you want customer phone numbers to be anonymized before they are transferred to the bot and the integrations, activate the Anonymize phone numbers for bot and integrations switch.
- Conversational AIs like Boost, Cognigy, Dialogflow, Rasa, Ubitec and other API consumers and integrations will only see anonymized phone numbers.
- If the customer phone numbers for bots and integrations have already been anonymized at the reseller level, the customer phone numbers will be anonymized automatically at all hierarchical levels below (Reseller > Customer > Account > Project). You cannot deactivate the setting in this case.
- If the switch Anonymize phone numbers for bot and integrations is enabled, VIER Cognitive Voice Gateway will hash the remote caller ID when communicating with bots and other services. The hash is deterministic: the same phone number will produce so that different customers can still be distinguished. For example, if a customer is calling a second time, bots could react to this differently. Hashed phone numbers can be identified by the keyword
md5-hash:at the start of the string (for example„remote":"md5-hash:ad14c520b9cfc53c25f446b338c79ced“instead of„remote":"+49111111111“). This affects the fieldsSessionParameters.remotein the Bot API andCallStarted.callerNumberin the Webhook API. - In VIER Cognitive Voice Gateway, caller numbers are stored in plain text or anonymized, depending on the configuration. To ensure that billing-relevant data is still available, VIER Cognitive Voice Gateway always saves the country as an abbreviation (e. g. DE) and the network (e. g. Mobile) for the numbers called.
- If you want customer phone numbers also to be anonymized in VIER Cognitive Voice Gateway itself, activate the Anonymize phone numbers for dialog history and billing checkbox.
- If you want to save dialog data that can be retrieved later via the dialog API, activate the Save dialog data checkbox.
- Under Automatically delete dialog data after, select when dialog data for the dialog API should be automatically deleted.
- VIER Cognitive Voice Gateway deletes dialog data after an adjustable period of time after the end of the dialog. 10 minutes are set here by default. This is sufficient, for example, to hand off dialogs to contact center services, where they are displayed after a hand off to the human agent.
NOTICE
Longer retention time for dialogs
In certain applications, a longer retention time for the dialogs is necessary. For example, if all dialogs are imported into reporting or analytics systems once a night. To enable this, the retention time can be set to up to one month.
- If you want to set a longer retention time, but this is not possible with the existing configuration of your project, contact the VIER Customer Service Desk.
You have set up data protection options.
NOTICE
Hierarchical structure
The function is structured hierarchically (Reseller > Customer > Account > Project). For example, if you choose to delete the data after 1 day, then only the options for further restrictions are available on the levels below (1 day, 1 hour and 10 minutes). A longer period cannot be selected (in the example, the 1 week option is not available on the levels below).
- Click Save.
- You have added a customer.

Edit customer
How to edit a customer:
Requirement
- You have added a customer [see Add customer].
- In the navigation bar under Administration, click Customers.
- Select the customer you want to edit.
- Click Edit and edit your customer.
- Click Save.
- Your changes have been saved.
Delete customer
NOTICE
Deletion of inactive customers
Inactive customers are irrevocably deleted after 90 days. You can see the planned deletion date in the customer overview.
How to delete a customer:
- In the navigation bar under Administration, click Customers.
- Select the customer you want to delete.
- Click Edit and then click Delete.
- Click Confirm.
- The customer has been deleted.
Restore customer
How to restore a customer:
- In the navigation bar under Administration, click Customers.
- Select the customer you want to restore.
- Click Restore.
- To confirm, click Restore.
- Your customer is restored.